
Custom Search
Monday, June 23, 2008
Monday, June 16, 2008
My Smudge/Text Tutorial (My first tutorial)
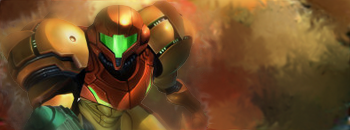
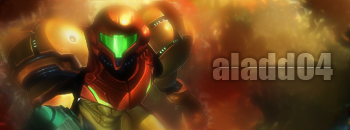
This is my first Photoshop tutorial, so sorry if I mess something up. Today we are going to learn on how to make a cool smudge and text effect. This is my result from this tutorial:

First start off by creating a new document, I chose 350px by 130px, make the background transparent. Now place the render in wherever you would like. Here’s where I put mine:

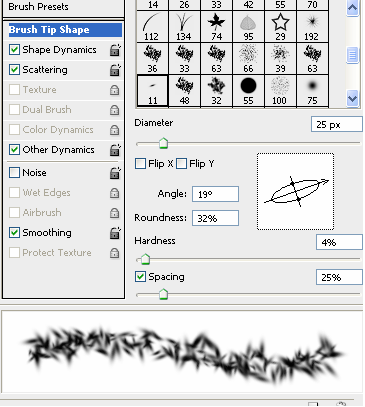
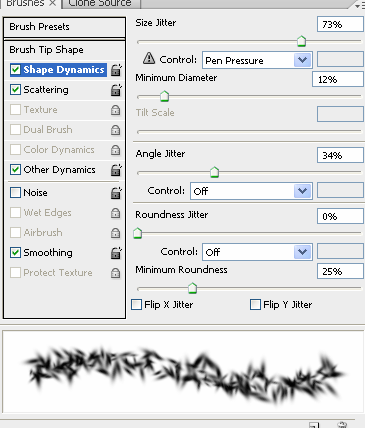
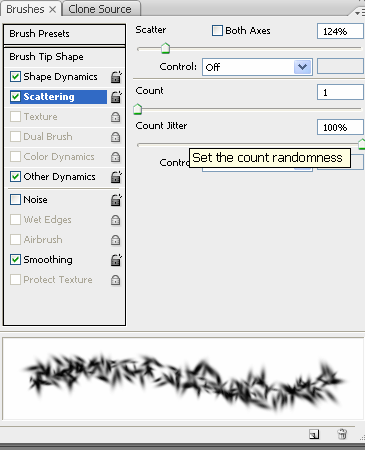
Duplicate your render layer (ctrl+J), now hide the original. On the new layer, you have one of two choices. You can either duplicate it a bunch of times and place them in spots so that you cannot see the background then merge all those layers (select them all of them and hit ctrl+e) or stretch the one duplicated layer you made so it takes up the whole screen, I choose the second option. After choosing one of those get out your smudge tool and apply these settings, or you can mess with the settings yourself to get something you prefer:
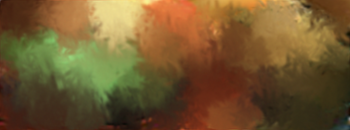
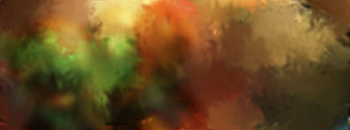
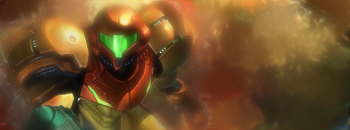
Now smudge the layer up a bit, try to keep it so you don’t have too much color in one area, try to get a nice variety, here’s what I came out with:
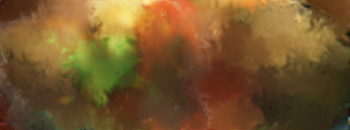
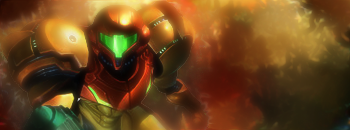
Now duplicate the original render again and put it on top, blur it with a Gaussian blur (filter>blur>Gaussian blur) at 4.0 the set the layer to soft light, I got this:
Create another copy of the original render and bring it to the top, with the same smudge tool options as you used before smudge this render up a little bit, more around the edges than anywhere else, set it to lighten. I got this:
Make yet another copy of the original layer and bring it up to the top, blur it with Gaussian blur and 3.0, then lower the opacity, I chose 48% and got this:
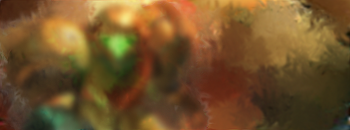
Now bring the original render layer up to the top and get out your lasso tool. Circle around the render and then select feather at about 15px, you can choose something else that fits your render. Now hit shift+ctrl+I to select the inverse, then hit delete a couple times or so, so it blends in better with the background. I got this:
Now make a new layer, go image, apply image. Set the layer to lighten, now with an eraser at about 50% opacity erase the parts that look bad, erasing is of course optional though. I got this:
Now do the same (new layer, image, apply image) but set the layer to soft light (then erase the parts that look bad, I mainly erased the render). I got this:
The next part is optional, I’m going to add some cool text and a border; you can add whatever you like. For the text pick the size and font that you like, then type the text you want to appear (user name etc…). Now take the rectangular marquee tool (m) and select half of the text (a line should be going through the middle horizontally). Right click and click layer via cut. You should now have 2 text layers, one is the bottom half of the text, the other is the top half. On each layer go into blending options (double click next to the name of the text layer) click drop shadow. Set it to these options on both text layers:
ht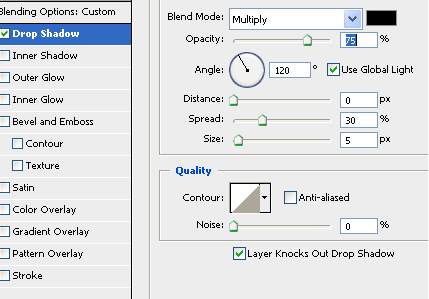
After doing that move the layers around until you have one very slightly overlapping the other one. I then set both of there opacity to 30%. If you don’t like the spot you put them but want to move them together select both of them by ctrl clicking on each, then get out the move tool (v) and move it to the correct spot. If done correctly you should get something like follows:
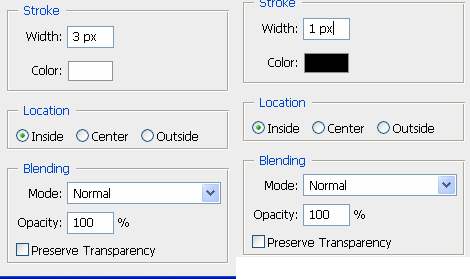
Now add a border and you’re done. The border that I like using is this: Make a new layer, then select all (ctrl+a) now go edit stroke twice, set it to these options
Set the layer to soft light and about 41% opacity and you should have a finished product that looks similar to this:
Thank you for reading my tutorial, I hope this helps everyone learn the basics of smudging, along with a cool text and border technique. Post all of your creations if you’d like.
Property of Aladd04 (Andy Ladd)
Do Not Rip.

First start off by creating a new document, I chose 350px by 130px, make the background transparent. Now place the render in wherever you would like. Here’s where I put mine:

Duplicate your render layer (ctrl+J), now hide the original. On the new layer, you have one of two choices. You can either duplicate it a bunch of times and place them in spots so that you cannot see the background then merge all those layers (select them all of them and hit ctrl+e) or stretch the one duplicated layer you made so it takes up the whole screen, I choose the second option. After choosing one of those get out your smudge tool and apply these settings, or you can mess with the settings yourself to get something you prefer:


Now smudge the layer up a bit, try to keep it so you don’t have too much color in one area, try to get a nice variety, here’s what I came out with:

Now duplicate the original render again and put it on top, blur it with a Gaussian blur (filter>blur>Gaussian blur) at 4.0 the set the layer to soft light, I got this:

Create another copy of the original render and bring it to the top, with the same smudge tool options as you used before smudge this render up a little bit, more around the edges than anywhere else, set it to lighten. I got this:

Make yet another copy of the original layer and bring it up to the top, blur it with Gaussian blur and 3.0, then lower the opacity, I chose 48% and got this:

Now bring the original render layer up to the top and get out your lasso tool. Circle around the render and then select feather at about 15px, you can choose something else that fits your render. Now hit shift+ctrl+I to select the inverse, then hit delete a couple times or so, so it blends in better with the background. I got this:

Now make a new layer, go image, apply image. Set the layer to lighten, now with an eraser at about 50% opacity erase the parts that look bad, erasing is of course optional though. I got this:

Now do the same (new layer, image, apply image) but set the layer to soft light (then erase the parts that look bad, I mainly erased the render). I got this:

The next part is optional, I’m going to add some cool text and a border; you can add whatever you like. For the text pick the size and font that you like, then type the text you want to appear (user name etc…). Now take the rectangular marquee tool (m) and select half of the text (a line should be going through the middle horizontally). Right click and click layer via cut. You should now have 2 text layers, one is the bottom half of the text, the other is the top half. On each layer go into blending options (double click next to the name of the text layer) click drop shadow. Set it to these options on both text layers:
ht

After doing that move the layers around until you have one very slightly overlapping the other one. I then set both of there opacity to 30%. If you don’t like the spot you put them but want to move them together select both of them by ctrl clicking on each, then get out the move tool (v) and move it to the correct spot. If done correctly you should get something like follows:

Now add a border and you’re done. The border that I like using is this: Make a new layer, then select all (ctrl+a) now go edit stroke twice, set it to these options

Set the layer to soft light and about 41% opacity and you should have a finished product that looks similar to this:
Thank you for reading my tutorial, I hope this helps everyone learn the basics of smudging, along with a cool text and border technique. Post all of your creations if you’d like.
Property of Aladd04 (Andy Ladd)
Do Not Rip.
Saturday, June 14, 2008
New Banner!!!
I made a kickass new banner, it took a while, and many many layers. The result is what you see at the top, and the link to the tutorial i used is HERE.
Friday, June 13, 2008
Thursday, June 12, 2008
Learn the basics of Curves
If u are a beginner to Photoshop u can learn the basics of curves by watching this video, LINK. Here is the video embedded as well so u don't have to go to youtube to watch it. If u have any questions on it either ask here, e-mail me, or ask the video creater.
Subscribe to:
Posts (Atom)